
serve_dynamic_ui is an open source Server-Driven UI library for Flutter. Create dynamic widgets in Flutter from jsons and extend to create your own dynamic widgets.

Installation
To install server_dynamic_ui
run the command
flutter pub add serve_dynamic_ui
Features

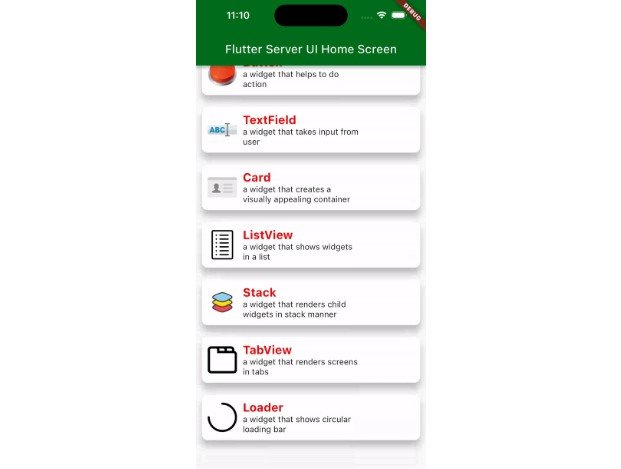
1. It has in-built DynamicWidgets.
- Scaffold
- Container
- SizedBox
- Text
- Button
- Image
- Card
- Column
- Row
- TabView
- ListView
- Loader
- GestureDetector
- Align
- Positioned
- Stack
- TextField
2. Extend to Create Custom DynamicWidgets.
3. In-built actions (as of now Navigation action, Update a dynamic widget action, handling user input action).
4. Extend to Create Custom Actions.
5. Invoke methods in a DynamicWidget.
6. Update DynamicWidget state.
7. Listen to controllers.
8. Handle form inputs.
9. Load JSON from assets or from the network.
Getting started
To use serve_dynamic_ui
initialize the package.
void main() {
  ServeDynamicUI.init();
  runApp(const MyApp());
}
Load the JSON and render the widget from asset.
@override
  Widget build(BuildContext context) {
    return ServeDynamicUIMaterialApp(
      home: (context) {
        return ServeDynamicUI.fromAssets('assets/json/sample.json', context);
      },
      title: 'Flutter Demo',
      theme: ThemeData(
        colorScheme: ColorScheme.fromSeed(seedColor: Colors.green),
        useMaterial3: false,
      ),
    );
  }
Usage
Initialize the package.
void main() {
  ServeDynamicUI.init();
  runApp(const MyApp());
}
structure of json
{
  "type": "registered_widget_name",
  //here you can add properties to configure the dynamic widget.
  "data": {
    "key": "required value to find the widget in widget tree",
    //other properties go here.
  }
}
Example Json
{
  "type": "dy_scaffold",
  "data": {
    "key": "123456",
    "pageTitle": "Flutter Server UI Home Screen",
    "child": {
      "type": "dy_column",
      "data": {
        "key": "423243",
        "children": [
          {
            "type": "dy_gesture_detector",
            "data": {
              "key": "1234234",
              "onTapAction": {
                "actionString": "/moveToScreen",
                "extras": {
                  "url": "https://raw.githubusercontent.com/Arunshaik2001/demo_server_driven_ui/master/assets/json/dy_scaffold.json",
                  "urlType": "network",
                  "requestType": "get",
                  "navigationType": "screen",
                  "navigationStyle": "push",
                  "loaderWidgetAssetPath": "assets/json/loader.json"
                }
              },
              "child": {
                "type": "dy_widget_card",
                "data": {
                  "key": "1323",
                  "margin": "10",
                  "elevation": 10,
                  "padding": "10",
                  "borderRadius": 10,
                  "body": {
                    "type": "dy_container",
                    "data": {
                      "key": "15345",
                      "padding": "10,0,0,0",
                      "child": {
                        "type": "dy_column",
                        "data": {
                          "key": "2457231",
                          "mainAxisAlignment": "spaceBetween",
                          "crossAxisAlignment": "start",
                          "children": [
                            {
                              "type": "dy_text",
                              "data": {
                                "key": "1734233",
                                "text": "Scaffold",
                                "style": {
                                  "color": "0xffff0000",
                                  "fontSize": 20,
                                  "fontWeight": "bold"
                                }
                              }
                            },
                            {
                              "type": "dy_container",
                              "data": {
                                "key": "813123",
                                "width": 200,
                                "child": {
                                  "type": "dy_text",
                                  "data": {
                                    "key": "8327757234",
                                    "text": "a widget that provides basic structure for building app's layout.",
                                    "maxLines": 3
                                  }
                                }
                              }
                            }
                          ]
                        }
                      }
                    }
                  },
                  "prefixImage": {
                    "type": "dy_image",
                    "data": {
                      "key": "16323233",
                      "src": "assets/images/icon_scaffold.png",
                      "height": 50,
                      "width": 50,
                      "imageType": "asset",
                      "fit": "fill",
                      "placeholderImagePath": "assets/images/icon_placeholder.png"
                    }
                  },
                  "action": {
                    "actionString": "/showSnackbar",
                    "extras": {
                      "title": "Scaffold"
                    }
                  }
                }
              }
            }
          },
          {
            "type": "dy_gesture_detector",
            "data": {
              "key": "24234234",
              "onTapAction": {
                "actionString": "/moveToScreen",
                "extras": {
                  "url": "assets/json/container.json",
                  "urlType": "local",
                  "navigationType": "screen",
                  "navigationStyle": "push"
                }
              },
              "child": {
                "type": "dy_widget_card",
                "data": {
                  "key": "22323",
                  "margin": "10",
                  "elevation": 10,
                  "padding": "10",
                  "borderRadius": 10,
                  "action": {
                    "actionString": "/showSnackbar",
                    "extras": {
                      "title": "Container"
                    }
                  },
                  "body": {
                    "type": "dy_container",
                    "data": {
                      "key": "345345",
                      "padding": "10,0,0,0",
                      "child": {
                        "type": "dy_column",
                        "data": {
                          "key": "2457231",
                          "mainAxisAlignment": "spaceBetween",
                          "crossAxisAlignment": "start",
                          "children": [
                            {
                              "type": "dy_text",
                              "data": {
                                "key": "2232734233",
                                "text": "Container",
                                "style": {
                                  "color": "0xffff0000",
                                  "fontSize": 20,
                                  "fontWeight": "bold"
                                }
                              }
                            },
                            {
                              "type": "dy_text",
                              "data": {
                                "key": "223667757234",
                                "text": "a widget that holds other widgets"
                              }
                            }
                          ]
                        }
                      }
                    }
                  },
                  "prefixImage": {
                    "type": "dy_image",
                    "data": {
                      "key": "2226323233",
                      "src": "https://www.saloodo.com/wp-content/uploads/2021/09/container-1-1.png",
                      "height": 50,
                      "width": 50,
                      "imageType": "network",
                      "fit": "fill",
                      "clipBorderRadius": 20,
                      "placeholderImagePath": "assets/images/icon_placeholder.png"
                    }
                  }
                }
              }
            }
          }
        ]
      }
    }
  }
}
Load the JSON and render the widget from asset.
@override
  Widget build(BuildContext context) {
    return ServeDynamicUIMaterialApp(
      home: (context) {
        return ServeDynamicUI.fromAssets('assets/json/sample.json');
      },
      title: 'Flutter Demo',
      theme: ThemeData(
        colorScheme: ColorScheme.fromSeed(seedColor: Colors.green),
        useMaterial3: false,
      ),
    );
  }
Load the JSON and render the widget from the network.
  @override
  Widget build(BuildContext context) {
    return ServeDynamicUIMaterialApp(
      home: (context) {
        return ServeDynamicUI.fromNetwork(DynamicRequest(
            url: 'https://github.com/Arunshaik2001/demo_server_driven_ui/blob/master/assets/json/dy_scaffold.json', requestType: RequestType.get));
      },
      title: 'Flutter Demo',
      theme: ThemeData(
        colorScheme: ColorScheme.fromSeed(seedColor: Colors.green),
        useMaterial3: false,
      ),
    );
  }
Extend to Create Custom DynamicWidget
Developer has to extend the class with DynamicWidget.
DynamicWidget looks like this
DynamicWidget.fromJson factory constructor to convert json to DynamicWidget object.
build method to create a Widget.
invokeMethod method to invoke any methods in a DynamicWidget.
childWidgets getter to maintain the child widgets under this widget.
Example Custom DynamicWidget
You can define your own properties and JSON should have key names as the class property names.
this project uses json_serialization and json_annotation.
Now to register.
ServeDynamicUI.init() takes optional parameter widgetHandlers where you can pass the custom widget in a map so that you can add more custom dynamic widgets.
Create custom action
handleAction is the only method in ActionHandler to handle the logical task.
Now, to register this.
Regex is used. so you need to pass the action as action string *actionString: /actionName?query1=value1&query2=value2
It is recommended to follow the above pattern.
So, in json it looks like this
            "onTapAction": {
                "actionString": "/moveToScreen",
                "extras": {
                  "url": "https://raw.githubusercontent.com/Arunshaik2001/demo_server_driven_ui/master/assets/json/dy_scaffold.json",
                  "urlType": "network",
                  "requestType": "get",
                  "navigationType": "screen",
                  "navigationStyle": "push",
                  "loaderWidgetAssetPath": "assets/json/loader.json"
                }
              }
you can pass the values you need in the extras map to handle the action.
FormWidget
A widget that validates the input data and gets the values in a map.
Extend Custom Dynamic Widget with FormWidget like TextField.
You can validate and decide how you want to send data in the Dynamic Widget.
To navigate between screenn
To go from one screen to another you need to use /moveToScreen action
            {
                "actionString": "/moveToScreen",
                "extras": {
                  "url": "https://raw.githubusercontent.com/Arunshaik2001/demo_server_driven_ui/master/assets/json/dy_scaffold.json",
                  "urlType": "network",
                  "requestType": "get",
                  "navigationType": "screen",
                  "navigationStyle": "push",
                  "loaderWidgetAssetPath": "assets/json/loader.json"
                }
              }
here in extras
- url: here you can pass asset path or network path
- urlType: define whether url is
networkorlocal. - requestType: type of request (get, post, delete, put).
- navigationType: type of navigation (screen, dialog, bottomSheet).
- loaderWidgetAssetPath: you can pass asset path which will be shown as loader widget while package fetch the network json.
To fetch form input
To get the user input in a page use this action /form.
  {
     "actionString": "/form"
  }
To update a dynamic Widget
To update a widget. you need to use the /updateWidget action and in the extras map pass the widgetKey and methodName you want to invoke and pass params map with the required data.
                  "action": {
                    "actionString": "/updateWidget",
                    "extras": {
                      "widgetKey": "update_text_key",
                      "methodName": "UPDATE_TEXT",
                      "params": {
                        "newText": "Updated Text Value"
                      }
                    }
                  }
Important: To make state changes the root widget must be DynamicProvider but you don’t need to worry about it as it is handled by the package.
If you want to update a dynamic widget. first, create a state class.
I am showing you by taking the example of the DynamicText class.
Now, create a getter that returns the state class instance for a unique widget key.
DynamicProvider has 2 maps stateCache and controllerCache which stores state classes and controller classes.
So that you will have a single instance of state class and controller class for a unique widget instance.
Listen to controllers
If you want that you need to listen to scroll controllers or text controllers present in a dynamic widget.
you can do something like this.
For scroll listener extend ScrollListener which has methods onScrolled onScrolledToEnd onScrolledToStart all have widget key which is the key of a widget which is being scrolled.
class WidgetScrollListener extends ScrollListener {
  @override
  void onScrolled(String? widgetKey) {
    debugPrint('onScrolled $widgetKey');
  }

  @override
  void onScrolledToEnd(String? widgetKey) {
    debugPrint('onScrolledToEnd $widgetKey');
  }

  @override
  void onScrolledToStart(String? widgetKey) {
    debugPrint('onScrolledToStart $widgetKey');
  }
}
now, you can register it like this.
DynamicListeners.addListener(WidgetScrollListener());
In the same way, for Text change listeners.
class TextUpdateListener extends TextChangeListener{
  @override
  void onTextChanged(String? widgetKey, String newValue) {
    debugPrint('onTextChanged $widgetKey $newValue');
  }
}
add this as listener
DynamicListeners.addListener(TextUpdateListener());
To know more check out example app.
Additional information
Please create issues here.
If you like to contribute to this project. Feel free to raise pull requests. 🙂