
Meme App using API and Provider
Splash Screen

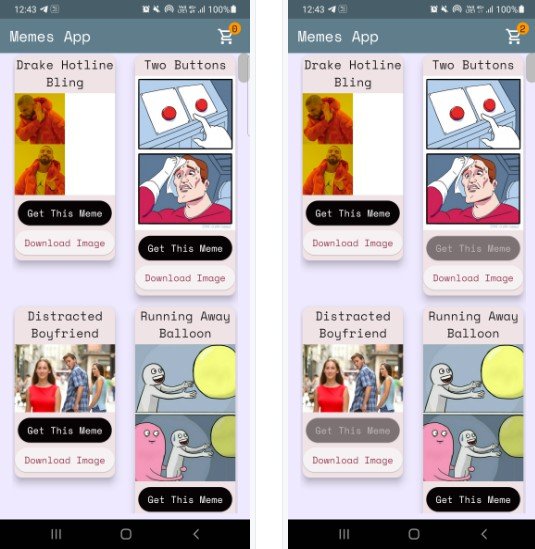
Home Screen Adding Items Cart Screen


Downloading Image Empty Cart


Recording:
memeapp.mp4
Packages used:
Detailed description of implementation
[i]. Fetching data from API and rendering UI
[ii]. Provider for state management
[iii]. Saving Image to Local Storage
[i]. Fetching data from API and rendering UI
Memes API : MemesAPI
Not sure How to parse JSON data from API? Detailed Explanation here
Code here : home_page.dart
Parsing the data from memesAPI
- memes is of type Future which will contain the fetched data.
- Note : late keyword is important.
- call the method in initState()
- use FutureBuilder to render the data on screen
- I used DynamicHeightGridView (package here), you may use any preferred widget/package that suits you.
- make sure you give itemCount property
- snapshot will either have data or error (
snapshot.hasData,snapshot.harError) - if
snapshot.hasDatarender the UI, else ifsnapshot.hasErrordisplay the error, else render a CircularProgressIndicator, i.e while waiting for data to be fetched.
DynamicHeightGridView(
                  crossAxisCount: 2,
                  mainAxisSpacing: 10,
                  crossAxisSpacing: 25,
                  itemCount:
                      //nullcheck operator
                      snapshot.hasData ? snapshot.data!.data!.memes!.length : 1,
                  builder: (context, index) {

                 //data fetched successfully
                    if (snapshot.hasData) {
                      //render UI here
                    }
//data couldn't be fetched due to some error
else if (snapshot.hasError) {
                      return Center(
                        child: Text("Error Occured : ${snapshot.error}"),
                      );
//waiting for data to be fetched (just the way youtube videos show circular progressor while buffering)
else {
                      return const Center(
                          child: CircularProgressIndicator(
                        color: Colors.teal,
                      ));
                    }
[ii]. Provider for state management
- We’ve rendered the UI. Great!
- But, think about the cart feature, whenever the “Get This Meme” button is tapped :
- how will the we increment the counter value on the top right corner on the cart icon?
- how will we render the UI accordingly in the cart page?
That’s where PROVIDER comes in!
Provider is a state management tool, you can refer more about it here : ProviderExample
Note : It may take sometime to understand provider, my case was no different. (Remember : Nothing comes overnight, good things take time!)
- Once/If you are familiar with provider, lets move ahead.
We have 2 basic requirements using provider.
Case-1 : Increment/Decreament the counter value on the cart icon on home page(refer images above).
Case-2 : Building the Cart page.
- define the Provider class
- make sure to extend ChangeNotifier
- declare an integer cartCount
- define the constructor(initalize cartCount value) and getter method
- define the methods increment() and decreament()
- notifyListeners()
Next, when will we need the provider?, when the button is pressed!, hence write the code inside the onPressed() function of button “Get this Meme”
Code here
Code here
Using read and watch is one way to do it. Another one is using the instance of the Provider class you made, lets discuss this approach for Case-2.
- Wondering what’s CartCardModel? (apologies for the confusing name 😐 )
- See, we need to show the image and name of the respective memes right.
- So, to not make things complicated, I defined a class named “CartCardModel”, which will have id, imageURL, and name of the meme.
- Why id?, to avoid duplicates!…id will ensure that once added, the same meme won’t be added again.
- ID can be anything that is unique to each item.
- Thankfully, MemeAPI has IDs for each item already included.
CartCardModel cart_card_model.dart
//each instance of this class (CartCardModel) will have the info of id, imageURL, and name.
//it will now be easier to display the memes in the cart page
class CartCardModel {
  String id;
  String? nameCart;
  String? imageUrlCart;
  CartCardModel({
    required this.id,
    this.nameCart,
    this.imageUrlCart,
  });
}
Now its convenient for us to render memes in the Cart Page.
We simply traverse the List and display items accordingly.
But, how will we make sure only those items are rendered which were added by the user?
Provider it is, again!.
Code cart_page.dart
Code here
Code here
Last but not the least, we need to implement the delete feature
[iii]. Saving Image to Local Storage
- The code is easy to understand.
And…Thats a Wrap!
I hope this helped you and you learnt something new. If you desire, consider giving this repo a ⭐. In case you have any queries, you can surely reach me out through my socials.
ALL THE BEST🙌